|
|

 |
|
|

|
|
Horstman DXL Clutch
The Horstman Disc Clutch is engineered specifically for kart racing and
should not be used for any other purpose. The following instructions will
help you install, adjust and maintain your clutch properly so that you get
maximum performance and value.
PRE-INSTALLATION PREPARATION
Before you install the clutch two important steps are recommended.
Step #1 Match the taper in the drive hub to the taper on the crankshaft. This can easily be accomplished in about 10 minutes by using coarse lapping compound and hand lapping until the two tapered surfaces are 100% seated. Be sure to clean of all lapping compound with a clean rag when finished.
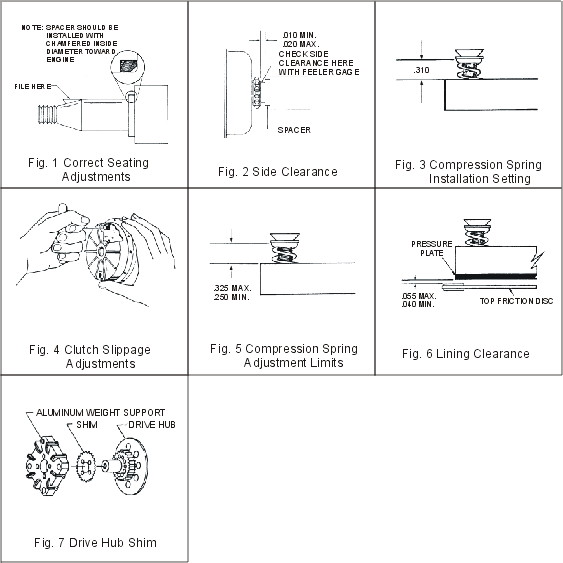
Step #2 The woodruff key may need to be filed if the clutch drive hub does not go all the way onto the taper. (See Fig. 1)
INSTALLATION
1. Install spacer with chamfered side toward engine. (See Fig. 1)
2. Slide drum onto crankshaft.
3. Insert woodruff key into crankshaft.
4. Slide drive hub assembly onto taper of crankshaft. Be sure the keyway
in the drive hub is aligned with the woodruff key in the crankshaft. Also
the ears on the friction discs must align with the channels in the drum.
5. Put Loc-Tite on threads and install sleeve nut. Torque to 300 inch
pounds.
6. Check side clearance (See Fig. 2) between sprocket and spacer.
7. Insert gasket into oil cover.
8. Slide oil cover onto clutch with all holes aligned.
9. Insert the eight screws 8-32 x 1/2" into oil cover and tighten
into the eight nuts.
10. Remove one oil filler plug and fill clutch 1/2 full with Horstman
clutch oil then replace plug.
11. Spin clutch by hand. If binding repeat step 6.
SIDE CLEARANCE
When the clutch is tightened securely to the shaft you should be able to spin the drum freely. If the drum does not spin freely, remove the clutch and grind some off the spacer. The minimum clearance recommended is .010" and the maximum is .020". If you have over .030" clearance, you may have the wrong spacer or the clutch is not seating all the way on the shaft. File more off the top of the key and try again.
CLUTCH ADJUSTMENT
Proper clutch adjustment will enable your engine to operate within its maximum power band, which should result in the fastest lap time possible. A tachometer is helpful in establishing the ideal RPM to slip the clutch. Each clutch is preset at the factory with the springs adjusted to a height of .310" from the bottom of the retainer to the top of the aluminum weight support (See Fig. 3). Run the clutch at this setting for 2 laps in order to seat the friction disc and to evaluate how the clutch is working. Then come into the pits and make your first adjustment if necessary.
The basic engagement of this clutch is predetermined by weights that pivot in response to centrifugal force. The pivoting of the weights is restrained by four compression springs and numerous engagement speeds can be obtained by adjusting the spring force. If the clutch hooks up too soon when coming off turns, you will lose critical lap time because the engine will bog. If the clutch overslips when coming off turns you will lose lap time, plus burn up the lining. The ideal adjustment of the DXL clutch is when you get a slight drop in engine RPM's (100 to 200) when the clutch hooks up.
HOW TO GET MORE SLIP
To get the clutch to slip more, you must increase the preload on the compression springs by turning the adjusting screws clockwise.
Use caution as clutch will be hot.
Turn clutch so that the oil plugs are at 12 o'clock and 6 o'clock. This
will prevent oil loss. Remove the plug at 12 o'clock.
Insert a 5/16" allen wrench into the sleeve nut that holds the clutch
onto the engine. With the 5/16" allen wrench, slowly rotate the
engine until the screw is visible. This will be your starting point.
With a 1/8" allen wrench, adjust this first screw by turning
clockwise 1/8 of a turn (See Fig. 4).
Then adjust all other screws the same amount (1/8 turn).
Check oil level and add oil if necessary.
Replace oil fill plug.
Go back onto the track and determine if you now have proper slip. If not,
come back to the pits and repeat steps 1 thru 7. Keep following procedure
until the clutch is dialed in to your requirement.
HOW TO GET LESS SLIP
If your clutch is over-slipping, go to the pits immediately and adjust the four screws counter-clockwise 1/4 turn.
Check oil level and go back onto the track and determine if clutch is hooking up better. If not, adjust the four screws counter-clockwise another 1/4 turn.
If the clutch still does not hook up correctly, it is necessary to remove the oil cover and check for oil problems. (See Maintenance)
ADJUSTMENT LIMITS
The clutch is designed to work within specific adjustment limits. If you go above the .325" maximum adjustment and the clutch still does not engage, this is an indication that the friction discs is worn out or something in the clutch is loose or broken. If you go below the .250" minimum limit, you will damage the springs, as they will bottom out when the clutch is engaging. If the springs bottom out, the clutch will not hook up solid, which will destroy the friction disc due to excess slippage.
INTERNAL CLEARANCE
It is very important that the clutch has between .040" minimum and .055" maximum clearance between the top friction disc and the pressure plate when measured with a feeler gauge (See Fig. 6).
NOTE: Every clutch is carefully inspected for the correct clearance before it is sold. You will need to check this clearance periodically to see if the friction disc is worn.
If you do not have at least .040" clearance it is necessary to install a shim between the drive hub and the aluminum weight support (See Fig. 7). If you have over recommended clearance and your friction discs is still good, them remove the shim.
HELPFUL TIPS
Use only Horstman Oil in this clutch. This is a special high temperature lubricant that gives the correct coefficient of friction that we have engineered to be compatible with the friction discs. Other types of oils are not recommended, especially E.P. oils.
Never screw the adjustment screws all the way down and then back out to get your adjustment, as this will damage the compression springs. Use the recommended starting height of .310" and make your adjustments from that point.
Never attempt to determine if you have enough slip by holding your foot on the brake and revving the engine. This is a sure way to overheat the clutch and burn the friction discs, plus you can damage the crankshaft.
Soak replacement friction disc in Horstman Oil for at least 5 minutes before using.
MAINTENANCE
Change clutch oil after every race.
Remove clutch and inspect after every 2 racedays.
When clutch is removed, check the following items and replace if necessary:
Friction discs, if worn below .080" overall thickness replace.
Check internal clearance if above maximum and friction discs are still
good, then remove the shim.
Check floaters for warpage.
Check pressure plate for warpage.
Check for broken springs.
Check for cracks in the drive hub or aluminum weight support.
Check for wear on the sprocket and bushing on 9T drums.
Check flat head screws for tightness.
NOTE: Cap screws are very important, as they hold the drive hub assembly
together. Always use new cap screws every time you disassemble the drive
hub. Never reuse these screws.
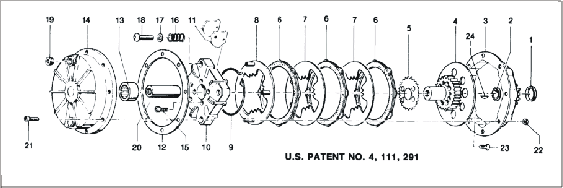
HORSTMAN 3 DISC DXL CLUTCH
The three disc style of oil bath clutches are the most popular due to their wide range of adaptability. The four spring models are used mainly on piston port 100cc motors. They are the preferred clutch in the sprint-lite and speedway 2 cycle divisions. 6 spring models are popular in Yamaha heavy classes.
All Copyrights Reserved 2003/2004 Casey Neal Racing